
Introduction
GPU acceleration can transform your machine learning workflow from painfully slow to blazingly fast. Training models that take hours on CPU can complete in minutes with GPU acceleration - we’re talking 10-100x speedups for deep learning workloads.
Setting up NVIDIA GPU support for TensorFlow on Windows Subsystem for Linux 2 (WSL2) isn’t straightforward. I recently configured my Dell laptop with an NVIDIA T1200 GPU for ML work and encountered numerous issues that the official documentation glossed over. This guide documents the complete process that worked, including all the gotchas and solutions.
What you’ll learn:
- Complete WSL2 and NVIDIA driver setup process
- Installing CUDA Toolkit 12.x and cuDNN for optimal performance
- Configuring TensorFlow to recognize and use your GPU
- Troubleshooting common errors (GPU not detected, version mismatches, etc.)
- Verifying your setup works correctly
- Performance optimization tips
What you’ll achieve:
- 10-100x faster model training compared to CPU
- Ability to work with larger models and datasets
- Professional ML development environment on Windows
- Cost savings vs. cloud GPU instances ($0.50-3.00/hour saved)
Prerequisites:
Before starting, ensure you have:
- Windows 10 (version 21H2+) or Windows 11
- NVIDIA GPU (GeForce, RTX, Quadro, or Tesla series)
- Check compatibility: RTX 20/30/40 series, GTX 16/10 series, or professional GPUs
- Minimum 4GB VRAM recommended (8GB+ ideal for deep learning)
- Administrator access to your Windows machine
- Basic command-line familiarity
- ~10GB free disk space
Time to complete: 45-60 minutes (including downloads)
Why WSL2 vs. Native Windows?
- Better Linux compatibility with ML libraries
- Faster I/O performance
- Native Docker integration
- Mirrors production Linux environments
- Easier package management with apt
Step 1: Install WSL2 and Set Up a Linux Distribution
Windows Subsystem for Linux (WSL) allows you to run a Linux environment directly on Windows, unmodified, without the overhead of a virtual machine. WSL2 improves performance and provides a full Linux kernel.
Enable WSL2 on Windows 10/11
- Open PowerShell as Administrator and run the following command:
wsl --install
- Restart your computer if prompted.
Install a Linux Distribution
- From the Microsoft Store, install a Linux distribution such as Ubuntu. I already had Ubuntu 22.04 installed and setup.
- Launch the installed distribution and complete the setup.
Step 2: Update and Upgrade Packages
Once you have your Linux distribution set up, it is essential to update your package list and upgrade all packages to ensure you have the latest software.
sudo apt update
sudo apt upgrade -y
Step 3: Install NVIDIA Drivers
To enable GPU support, ensure you have the latest NVIDIA drivers installed on your Windows system. Download and install the drivers from the NVIDIA website .
Step 4: Install CUDA Toolkit
CUDA is a parallel computing platform and application programming interface (API) model created by NVIDIA. Installing the CUDA Toolkit enables GPU acceleration for TensorFlow.
Add NVIDIA’s Package Repository
Add the CUDA repository to your system and install the CUDA Toolkit:
Download and move the repository pin:
wget https://developer.download.nvidia.com/compute/cuda/repos/ubuntu2004/x86_64/cuda-ubuntu2004.pin
sudo mv cuda-ubuntu2004.pin /etc/apt/preferences.d/cuda-repository-pin-600
Download and install the local repository package:
wget https://developer.download.nvidia.com/compute/cuda/11.4.1/local_installers/cuda-repo-ubuntu2004-11-4-local_11.4.1-470.57.02-1_amd64.deb
sudo dpkg -i cuda-repo-ubuntu2004-11-4-local_11.4.1-470.57.02-1_amd64.deb
sudo apt-key add /var/cuda-repo-ubuntu2004-11-4-local/7fa2af80.pub
sudo apt-get update
Install CUDA Toolkit
- Install the CUDA Toolkit using the following command:
sudo apt-get -y install cuda
- Validate that it all works by using the
nvidia-smicommand:
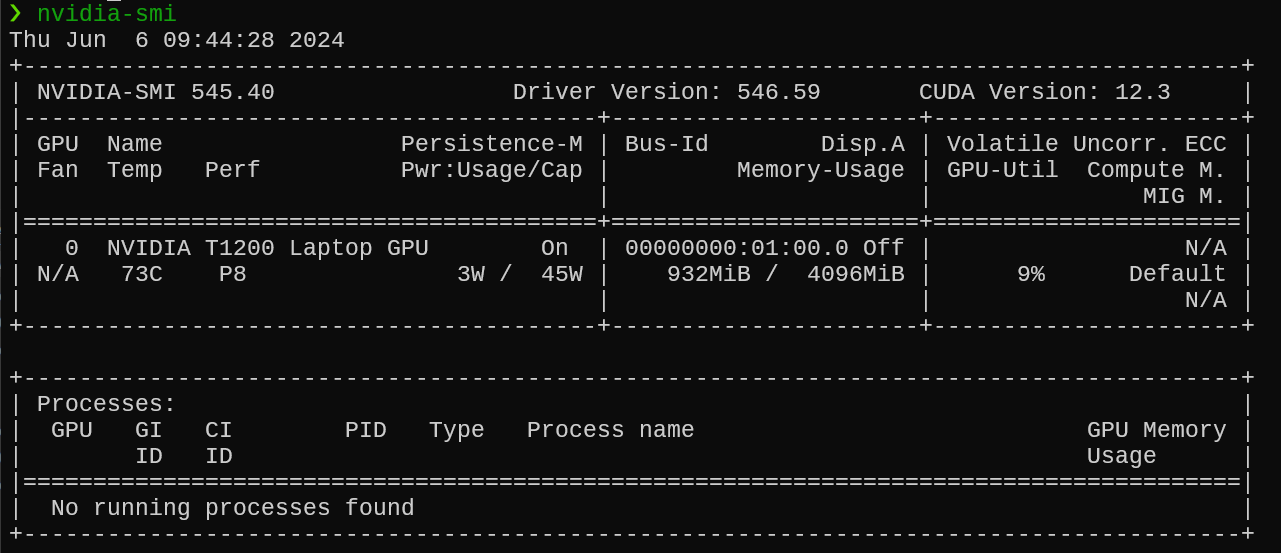
Step 5: Install cuDNN
cuDNN is a GPU-accelerated library for deep neural networks. It is required for TensorFlow to leverage the GPU for model training and inference.
Download cuDNN
Visit the NVIDIA cuDNN page and download the cuDNN tar file for your CUDA version.
Install cuDNN
Extract the downloaded file and copy the contents to the CUDA installation directory:
tar -xzvf cudnn-11.4-linux-x64-v8.2.4.15.tgz
sudo cp cuda/include/cudnn*.h /usr/local/cuda/include
sudo cp cuda/lib64/libcudnn* /usr/local/cuda/lib64
sudo chmod a+r /usr/local/cuda/include/cudnn*.h /usr/local/cuda/lib64/libcudnn*
Step 6: Set Environment Variables
To make CUDA and cuDNN available to TensorFlow, add their paths to your environment variables.
echo 'export PATH=/usr/local/cuda/bin:$PATH' >> ~/.bashrc
echo 'export LD_LIBRARY_PATH=/usr/local/cuda/lib64:$LD_LIBRARY_PATH' >> ~/.bashrc
source ~/.bashrc
Step 7: Verify Installation
Verify the installation of CUDA and cuDNN to ensure everything is set up correctly.
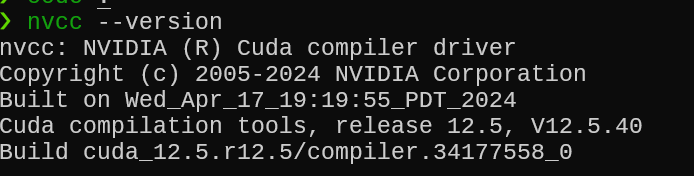
Check CUDA Installation
nvcc --version
This is my output:
Verify TensorFlow GPU Access
Create a simple Python script to verify that TensorFlow can access the GPU:
import tensorflow as tf

print("Num GPUs Available: ", len(tf.config.list_physical_devices('GPU')))
Expected Output
You should see output confirming the availability of GPUs. For example:
Num GPUs Available: 1
Step 8: Install TensorFlow with GPU Support
Finally, ensure that TensorFlow is installed with GPU support.
pip install tensorflow
Step 9: Verify TensorFlow install and access to GPU
You can use the below code the quickly check and ensure that TensorFlow is installed successfully and is able to use the GPU
import tensorflow as tf

print("TensorFlow Version:", tf.__version__)

# List available devices
print("Available devices:")
for device in tf.config.list_physical_devices():
    print(device)

# Check for GPU
gpus = tf.config.list_physical_devices('GPU')
if gpus:
    print("GPU is available: ", gpus)
else:
    print("No GPU found")

from tensorflow.python.client import device_lib
print(device_lib.list_local_devices())
Troubleshooting Common Issues
Even following these steps carefully, you may encounter issues. Here are solutions to the most common problems:
Issue 1: GPU Not Detected by TensorFlow
Symptom:
Num GPUs Available: 0
Causes & Solutions:
1. CUDA/cuDNN Version Mismatch
# Check TensorFlow's CUDA requirements
python -c "import tensorflow as tf; print(tf.sysconfig.get_build_info())"

# Should show something like:
# cuda_version: '12.3'
# cudnn_version: '8'
Ensure your installed CUDA version matches TensorFlow’s requirements. TensorFlow 2.15+ requires CUDA 12.x.
2. Missing LD_LIBRARY_PATH
# Check if CUDA libraries are in path
echo $LD_LIBRARY_PATH

# If empty or missing /usr/local/cuda/lib64, add it:
echo 'export LD_LIBRARY_PATH=/usr/local/cuda/lib64:$LD_LIBRARY_PATH' >> ~/.bashrc
source ~/.bashrc
3. Verify NVIDIA Driver in WSL2
nvidia-smi

# If command not found or shows error, reinstall Windows NVIDIA drivers
# Download latest from: https://www.nvidia.com/Download/index.aspx
Issue 2: “Could not load dynamic library ’libcudnn.so.8'”
Symptom:
Could not load dynamic library 'libcudnn.so.8'; dlerror: libcudnn.so.8: cannot open shared object file
Solution:
# Check if cuDNN files exist
ls /usr/local/cuda/lib64/libcudnn*

# If missing, reinstall cuDNN:
# 1. Download from https://developer.nvidia.com/cudnn
# 2. Extract and copy:
tar -xzvf cudnn-linux-x86_64-8.9.7.29_cuda12-archive.tar.xz
sudo cp cudnn-*-archive/include/cudnn*.h /usr/local/cuda/include
sudo cp -P cudnn-*-archive/lib/libcudnn* /usr/local/cuda/lib64
sudo chmod a+r /usr/local/cuda/include/cudnn*.h /usr/local/cuda/lib64/libcudnn*

# Create symbolic link if needed
cd /usr/local/cuda/lib64
sudo ln -s libcudnn.so.8.9.7 libcudnn.so.8
Issue 3: “Failed to create session”
Symptom:
tensorflow.python.framework.errors_impl.InternalError: Failed to create session
Causes:
- Insufficient GPU memory
- Another process using the GPU
Solutions:
Check GPU memory usage:
nvidia-smi

# Look for processes in the "Processes" section
# Kill competing processes if needed
Configure TensorFlow to use less memory:
import tensorflow as tf

# Option 1: Limit GPU memory growth
gpus = tf.config.list_physical_devices('GPU')
if gpus:
    try:
        for gpu in gpus:
            tf.config.experimental.set_memory_growth(gpu, True)
    except RuntimeError as e:
        print(e)

# Option 2: Set specific memory limit (e.g., 4GB)
gpus = tf.config.list_physical_devices('GPU')
if gpus:
    tf.config.set_logical_device_configuration(
        gpus[0],
        [tf.config.LogicalDeviceConfiguration(memory_limit=4096)]
    )
Issue 4: “XLA service compilation failure”
Symptom:
XLA service 0x... failed to compile
Solution:
# Disable XLA compilation
import os
os.environ['TF_XLA_FLAGS'] = '--tf_xla_enable_xla_devices=false'

import tensorflow as tf
Issue 5: WSL2 Can’t See NVIDIA Driver
Symptom:
nvidia-smi
# Returns: command not found or "Failed to initialize NVML"
Solutions:
1. Update WSL2 Kernel
# In PowerShell as Administrator
wsl --update
wsl --shutdown
# Restart WSL
2. Reinstall NVIDIA Driver on Windows
- Uninstall current NVIDIA driver
- Download latest Game Ready or Studio driver
- Install with “Clean Installation” option checked
- Restart Windows
3. Check WSL2 Version
wsl --list --verbose

# Ensure your distro is WSL2, not WSL1
# If WSL1, convert:
wsl --set-version Ubuntu-22.04 2
Issue 6: Slow Performance Despite GPU
Possible causes:
- Data transfer bottleneck (CPU → GPU)
- Small batch sizes
- Mixed precision not enabled
Solutions:
Enable mixed precision:
from tensorflow.keras import mixed_precision
mixed_precision.set_global_policy('mixed_float16')

# Can provide 2-3x speedup on modern GPUs
Use tf.data for efficient data loading:
dataset = tf.data.Dataset.from_tensor_slices((x_train, y_train))
dataset = dataset.cache()
dataset = dataset.shuffle(buffer_size=10000)
dataset = dataset.batch(64)
dataset = dataset.prefetch(tf.data.AUTOTUNE)
Increase batch size:
# Larger batches = better GPU utilization
# Start with 32, increase to 64, 128, 256 if memory allows
model.fit(x_train, y_train, batch_size=128)
Issue 7: CUDA Version Conflicts
Symptom: Multiple CUDA versions installed causing conflicts
Solution:
# Remove all CUDA packages
sudo apt-get --purge remove "*cublas*" "*cufft*" "*curand*" "*cusolver*" "*cusparse*" "*npp*" "*nvjpeg*" "cuda*" "nsight*"
sudo apt-get autoremove
sudo apt-get autoclean

# Remove leftover files
sudo rm -rf /usr/local/cuda*

# Clean install CUDA 12.x
# Follow Step 4 again with latest version
Performance Optimization Tips
Once you have GPU acceleration working, optimize for maximum performance:
1. Monitor GPU Utilization
# Watch GPU usage in real-time
watch -n 1 nvidia-smi

# For detailed metrics
nvidia-smi dmon -s pucvmet
Target: 80-100% GPU utilization during training If lower: Increase batch size or optimize data pipeline
2. Use TensorFlow Profiler
# Profile your model to find bottlenecks
import tensorflow as tf

# Enable profiling
tf.profiler.experimental.start('logdir')

# Your training code here
model.fit(...)

# Stop profiling
tf.profiler.experimental.stop()

# View in TensorBoard:
# tensorboard --logdir logdir
3. Enable Tensor Cores (RTX GPUs)
# Tensor Cores provide massive speedups for mixed precision
from tensorflow.keras import mixed_precision
mixed_precision.set_global_policy('mixed_float16')

# Verify Tensor Core usage
print(mixed_precision.global_policy())
4. Optimize Data Pipeline
AUTOTUNE = tf.data.AUTOTUNE

dataset = (tf.data.Dataset.from_tensor_slices((x_train, y_train))
    .cache()  # Cache dataset in memory
    .shuffle(10000)
    .batch(batch_size)
    .prefetch(AUTOTUNE))  # Overlap data loading with training
5. Use Multiple GPUs (If Available)
# For systems with multiple GPUs
strategy = tf.distribute.MirroredStrategy()
print(f'Number of devices: {strategy.num_replicas_in_sync}')

with strategy.scope():
    model = create_model()
    model.compile(...)

model.fit(...)  # Automatically uses all GPUs
Summary of Steps
- Enable WSL2 and install a Linux distribution (e.g., Ubuntu).
- Update and upgrade packages in the Linux distribution.
- Install NVIDIA drivers on Windows.
- Add NVIDIA’s package repository and install the CUDA toolkit.
- Download and install cuDNN, copying the necessary files to the CUDA directory.
- Set environment variables for CUDA and cuDNN.
- Verify the installation of CUDA and cuDNN.
- Install TensorFlow with GPU support.
- Verify TensorFlow install and access to GPU.
Frequently Asked Questions
Do I need an expensive GPU for deep learning?
Not necessarily. While high-end GPUs like RTX 4090 or A100 are ideal, you can get started with:
- Budget: GTX 1660 (6GB VRAM) - $200-300 - Good for learning and small models
- Mid-range: RTX 3060 (12GB VRAM) - $300-400 - Handles most projects
- Professional: RTX 4070 Ti+ or A-series - $800+ - For serious ML work
Even a 4GB GPU is 10-50x faster than CPU for many tasks.
Can I use AMD GPUs instead of NVIDIA?
Unfortunately, TensorFlow and PyTorch have much better NVIDIA support. AMD’s ROCm platform exists but has limited compatibility. For ML work, NVIDIA GPUs are strongly recommended.
Will this work with Docker containers?
Yes! After completing this setup:
# Install Docker in WSL2
sudo apt-get install docker.io

# Use NVIDIA Container Toolkit
distribution=$(. /etc/os-release;echo $ID$VERSION_ID)
curl -s -L https://nvidia.github.io/nvidia-docker/gpgkey | sudo apt-key add -
curl -s -L https://nvidia.github.io/nvidia-docker/$distribution/nvidia-docker.list | sudo tee /etc/apt/sources.list.d/nvidia-docker.list

sudo apt-get update
sudo apt-get install -y nvidia-docker2
sudo systemctl restart docker

# Run TensorFlow with GPU in Docker
docker run --gpus all -it tensorflow/tensorflow:latest-gpu python
How much faster is GPU vs CPU for training?
Speed improvements vary by model architecture:
- CNNs (Image models): 10-50x faster
- Transformers (NLP): 20-100x faster
- Simple neural networks: 2-10x faster
- Data preprocessing: Minimal improvement (CPU-bound)
Example: Training ResNet-50 on ImageNet:
- CPU: ~7 days
- Single RTX 3080: ~8 hours
- That’s 20x speedup!
Do I need to install CUDA on Windows too?
No! Only install CUDA inside WSL2. Windows only needs the NVIDIA driver. The WSL2 CUDA toolkit is separate from any Windows CUDA installation.
Can I use Jupyter Notebook with this setup?
Absolutely! After setup:
pip install jupyter

# Start Jupyter
jupyter notebook --no-browser

# Access from Windows browser at:
# http://localhost:8888
Your notebooks will have full GPU access.
How do I switch between CPU and GPU?
import tensorflow as tf

# Force CPU usage
with tf.device('/CPU:0'):
    # Your code here
    model.fit(...)

# Force GPU usage
with tf.device('/GPU:0'):
    # Your code here
    model.fit(...)

# Auto-select (default behavior - uses GPU if available)
model.fit(...)  # Automatically uses GPU
What if I have multiple GPUs?
TensorFlow automatically uses the first GPU. To use multiple GPUs:
# List all GPUs
gpus = tf.config.list_physical_devices('GPU')
print(f"Available GPUs: {len(gpus)}")

# Use specific GPU
tf.config.set_visible_devices(gpus[1], 'GPU')  # Use second GPU

# Use all GPUs with data parallelism
strategy = tf.distribute.MirroredStrategy()
with strategy.scope():
    model = create_model()
Key Takeaways
- GPU acceleration provides 10-100x speedups for deep learning training
- WSL2 offers the best of both worlds: Windows desktop + Linux ML environment
- CUDA 12.x + TensorFlow 2.15+ is the current recommended stack
- Troubleshooting is normal: Most issues are version mismatches or missing environment variables
- Monitor GPU utilization: Aim for 80-100% during training for optimal efficiency
- Mixed precision training can double your performance on modern GPUs
What’s Next?
Now that you have GPU-accelerated TensorFlow running, here’s how to level up:
Immediate Next Steps:
Test your setup with a real model:
# Clone TensorFlow examples
git clone https://github.com/tensorflow/models.git
cd models/official/vision/image_classification

# Train a quick model to verify GPU works
python classifier_trainer.py
Set up Jupyter for interactive development
pip install jupyter ipykernel
jupyter notebook
Bookmark NVIDIA tools:
Continue Learning:
- Explore TensorFlow tutorials at tensorflow.org/tutorials
- Learn performance optimization techniques
- Experiment with transfer learning using pre-trained models
- Try PyTorch for comparison: similar setup process
Join the Community:
- TensorFlow Forum: discuss.tensorflow.org
- Reddit: r/MachineLearning, r/tensorflow
- Stack Overflow: Tag
tensorflow+gpu
Conclusion
You now have a professional-grade machine learning development environment that rivals expensive cloud GPU instances. With 10-100x faster training times, you can:
- Iterate on models quickly during development
- Train larger, more complex networks
- Experiment with state-of-the-art architectures
- Save hundreds of dollars monthly vs. cloud GPUs
Pro tip: Keep your environment maintained:
- Update NVIDIA drivers quarterly
- Update TensorFlow when new versions release
- Monitor CUDA/cuDNN compatibility
- Backup your environment configuration
The setup process can be challenging, but the performance gains are absolutely worth it. You’ve just unlocked the ability to tackle serious machine learning projects right from your Windows laptop.
Got it working? Share your success! What GPU are you using and what speedup are you seeing?
Still stuck? Drop a comment below with your error message - I’ll help you troubleshoot.
Found this guide helpful? Share it with others struggling with GPU setup on WSL2!